3D printing is making its presence felt in every niche. Either its education or aerospace, the benefits of parts manufactured with the help of 3D printing has surprised everyone.
Companies and businesses are realizing what the technology entails and are eager to make 3D printing a part of their company’s operation.
The start of this innovative technology dates back to 80’s when it used to be called as rapid prototyping as it aimed at creating prototypes which were cheaper and faster. However, we have come a long way since then.
Today, 3D printing technology can be modified to turn any idea into real objects. As the time is passing, this innovation is refining itself and becoming available for various application.
Also known as additive manufacturing, 3D printing is very different from the traditional manufacturing methods.
Instead of going through numerous stages, one can achieve even better results with one command.
Once you have created a blueprint and went through the scaling process, a simple print command will do the rest.
So what’s the best 3D printer for me ? There are many types of 3D printers to choose from and best suited for your needs.
One has to be very precise about what they need before getting one.
Many businesses or individuals spend months learning the various usage of different 3D printers and how can they choose among a long list.
To make the job easier, all you need is some important details about each of them to take the final decision.
1. Stereolithography (SLA)
 Credits: Manufactur3DMag.com
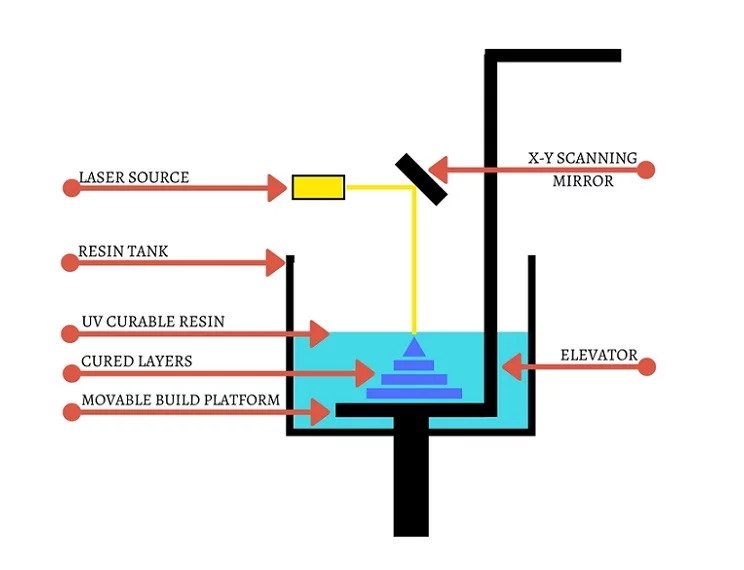
SLA works on technology known as vat photopolymerization.
The 3D printer built on this technology uses a light source in the form of projector or a laser and is used for curing liquid resin to get the hard plastic parts.
The resins used in the SLA 3D printing is a thermoset material which is reactive to light.
When the desired wavelength of light is exposed on the resin, the molecular chains join together to form hardened and solidified parts.
There are various characteristics of resin is available based on the need for creating parts with different mechanical, thermal and optical properties.
Previously SLA was limited to monolithic industrial setup.
However, in 2011, when Formlabs adapted the technology, it soon triggered the need for high resolution 3D printing in the form of desktop SLA.
This not only increased its application verticals but also made it available to a large number of populations.
The second revolution in the space of SLA printing arrived when Formlabs released the second generation of SLA printers.
This time, the 3D printers built on SLA process was able to manufacture wide range of parts benefiting medical industry to commercial companies.
This year in 2019, two new versions are realized: Form 3 and Form 3L by Formlabs.
The new hardware setup is claimed to fit ever a greater number of usages providing better printing quality and sustainability.
Why SLA?
SLA 3D printing is used for wider range of application. The reason lies in the properties of parts manufactured with the SLA 3D printing.
 Credits: 3dspectratech.com
Isotropic:
Many other 3D printing technologies including FDM end up in anisotropic parts which means that the different layers have different strength. This restricts the usage of FDM for various critical printing needs.
However, this is not the case with SLA 3D printing. Because the parts are printed layer by layer, maintaining the same strength across all the layers becomes a challenge.
SLA printing has overcome that problem and hence, has been one of the major reasons for being used for variety of applications.
Precise:
In industries like medical and various others, precision is the key for the best results.
Either it’s about creating dentures or prosthetics, one needs exact accuracy to provide best experience to those in need.
The technology provides highest tolerance among the 3D printing manufacturing processes used commercially.
Smoothness:
Parts printed with SLA 3D printing offer smoothness and better quality over the ones manufactured using traditional methods.
3D printing manufacturing companies demanding flawless finish can attain the same using SLA 3D printing.
Detailed Feature:
If you are looking to create parts with fine features and detailed sharpness, SLA 3D printing is your answer.
In any 3D printing technology, z axis plays an important role in setting the resolution of the parts.
This lower the micron, the better is the resolution. And, with SLA 3D printer, the z-axis can be set to as lower as 25 microns when its 100 microns in FDM.
Diverse Material Characteristics:
SLA 3D printing can print parts with different physical and mechanical characteristics.
Either you are looking for a part filled with ceramic or glass, or wanting hardness or softness, everything is possible with SLA 3D printing.
Benefits of SLA 3D Printing
Depending on your requirement, you can choose between a desktop SLA version or the one used for high industrial production. While small version of SLA 3D printer helps you process things faster and is easier, large setups are good for large number of productions simultaneously.
✔️ Cut Cost:
Instead of outsourcing the need for 3D printing or using the traditional methods, installing one at your place will make huge difference in the cost. If the workload is high, it is even more necessary.
✔️ Minimum Turnaround Time:
Why to wait for someone else to deliver your part while you can do it before time when printing at your end.
You can reduce the shipping time and printing time by prioritizing your work on top of no ones.
You can drastically shorten the production time and can create multiple parts in a day without worrying about the hectic methods or depending upon someone else to deliver it to you.
✔️ Best for Functional as well as Visual Prototypes:
SLA 3D printing is capable of creating visual as well as functional prototypes with ease.
Either your priority is to manufacture a great finished part or a highly sustainable one, SLA 3D printing can make that happen with ease.
2. Digital Light Processing (DLP)
 Credits: wikipedia.org
Digital Light Processing (DLP) is similar to SLA and is based on stereolithography.
The technology of 3D printing is great when it comes to develop rapid prototypes.
Although SLA and DLP sound similar, they do have differences in their operation.
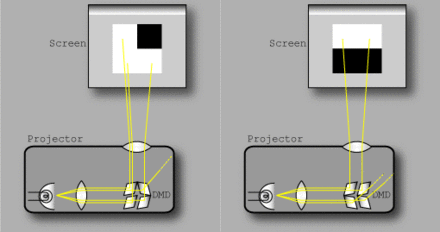
While SLA uses laser, DLP works with projector light which cures the photosensitive resin to manufacture parts and prototypes.
When the projector light falls on the resin, the image of the object highlights across the section of the resin.
At once, a layer of exposed resin hardens. One the layer is prepared, the surface moves downwards, creating the second layer.
This goes on until the final part is printed.
After the part is printed, manual intervention taking care of the post processing may be required.
It may include support material removal, UV curing or chemical bath.
Like other 3D printing machine based on stereolithography, DLP also produces high resolution parts.
With major success in creating prototypes with finer resolution and finishing qualities, DLP is considered as SLA’s sister technology.
Difference Between DLP and SLA
By just reading the overview, many would confuse DLP and SLA as the similar technology.
However, there are differences which must be noted when thinking of choosing between these two.
There is a huge difference in the processed part when prepared with laser concentrating on each layer at a time in comparison to getting a flat image with the help of projector at once while each layer is prepared.

- Working of DLP and SLA
In SLA 3D printers, there are two motors installed at X and Y axis which is utilized for aiming of the laser light to get the coordinates for printing of each layer at a time. However, when it comes to DLP 3D printers, a digital projector glass gets the job done in simpler way.
The design is broken into series of lines and points during SLA 3D printing. Whereas, the design is broken in square pixels in case of DLP 3D printing.
- 3D printing Speed
Because of the use of digital projector, DLP 3D printing can provide faster processing time as compared to the SLA 3D printers. This is usually true in two cases.
For complete solidified parts, DLP 3D printing can provide fast turnaround time.
This is because of the projector that helps in exposing further layers faster than when laser is used. The other case is when you wish to print small prints with fine details.
Only by swapping the projector lens and using narrow light source to expose the smaller build volume area, one can get faster result when using DLP as compared to when SLA is used.
- Print Quality
The print quality is still better with SLA. Because the image resolution depends on pixels, getting detailed finer results are restricted when using DLP.
This isn’t the case with SLA. Also, surface finish is better with SLA. In DLP 3D printing, the layer lines are more visible as compared to the SLA 3D printing.
Applications of DLP
DLP is used for vast purposes. Based on the properties with normal strength which can further be machined as well as customized as per the requirement, DLP 3D printers can be used for printing prototypes, metal casting application or patterns for injection modeling.
As DLP is fit for large parts, one can achieve as much as 2m length when printing using DLP 3D printers.
The applications stretch from education to manufacturing to medical niche.
One can make use of the technology for realizing ideas and customizing designs at faster rate.
3. Fused deposition Modeling (FDM)
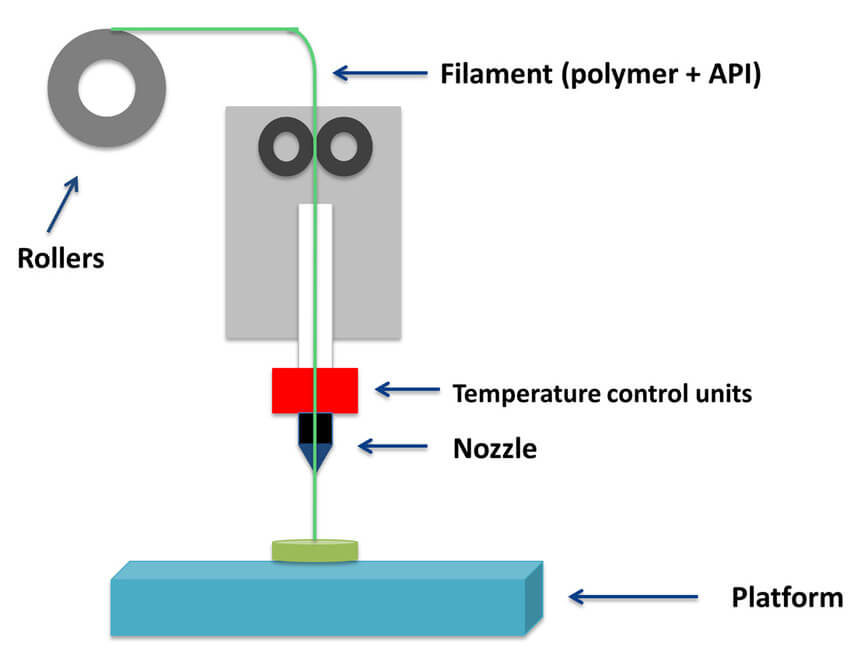
Unlike SLS and DLP, Fusion Deposition Modeling abbreviated as FDM in based on material extrusion technology.
In this technology, instead of curing photosensitive resin, filaments are used. The melted material is deposited layer by layer.
The thermoplastic polymer that is available in the market in the filament form is used to print objects through FDM 3D printing.
 Credits: Researchgate.net
Because of its low cost and ease of working, the FDM 3D printers are the most widely used printers and often the first to be introduced to those starting to work with 3D printers.
Working with FDM 3D Printers
FDM works in a completely different fashion as opposed by SLA or DLP 3D printers.
It is comparatively easier to use and requires less amount of complex setting when put along with other options.
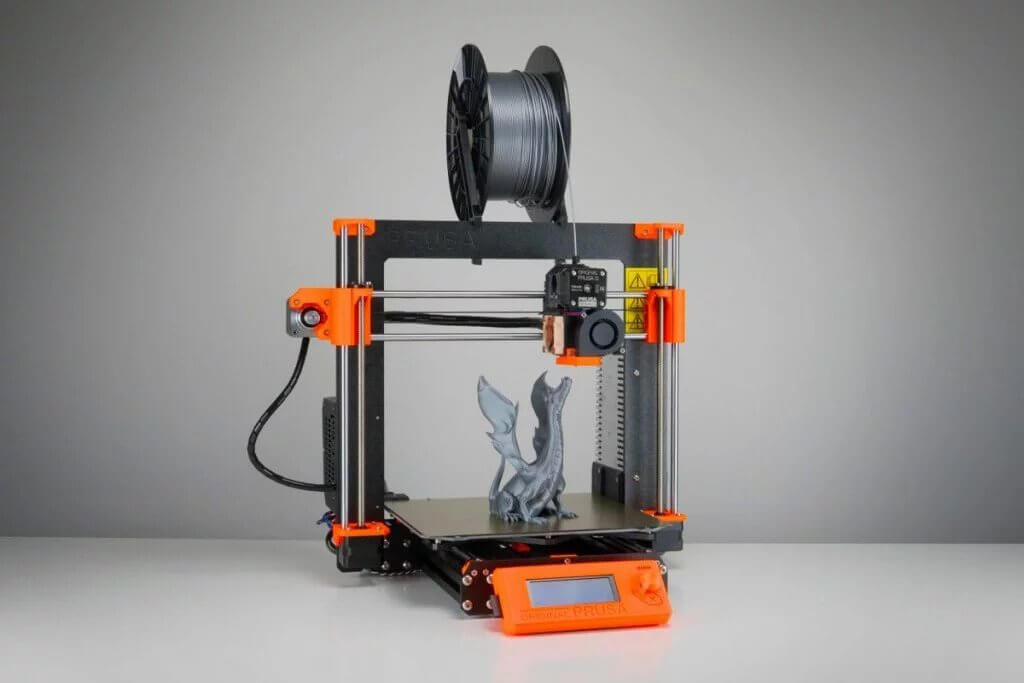 3D Printer: Original Prusa i3 MK3S Kit
Loading of Filament: At first, a reel of filament (choices available) is loaded in the printer. Soon after, the nozzle has reached the specific temperature just above the melting point, the filament is passed through the extrusion head. This is where the filament melts and becomes ready for deposition.
Layer Formation: The thin strand of melted filament is deposited taking various turns along X, Y and Z axis. The deposition is done on the predetermined locations. Not always, but sometimes, cooling fan is required to set the melted filament faster.
Finishing the Part: Every time a layer is set, the surface moves down giving way to the next layer. The parts sometimes require support material (some of which are water soluble and dissolves to separate the part from it).
Printed Parts Features
FDM 3D printing is the most accessible one and is used for various designs. However, there are certain features that make it infeasible for high precision parts and complex geometric designs.
Benefits of FDM
Apart from the listed shortcomings, FDM is considered the most used 3D printer because of the benefits it provides.
- FDM is the most cost saving option when it comes to print 3D parts from its blueprint.
- FDM can create customized parts and prototypes much easily as compared to the other 3D printing processes.
- The turnaround time is also very low when compared with the other technologies.
- You get to use different material and filament with different characteristics and usages.
4. Selective Laser Sintering (SLS)
Selective laser sintering, also known as SLS, is highly used for printing functional as well as visual prototypes and is great solution for smaller productions.
When it comes to accuracy and consistence in mechanical properties of the parts printers, SLS does an outstanding job, even leaving SLA behind.
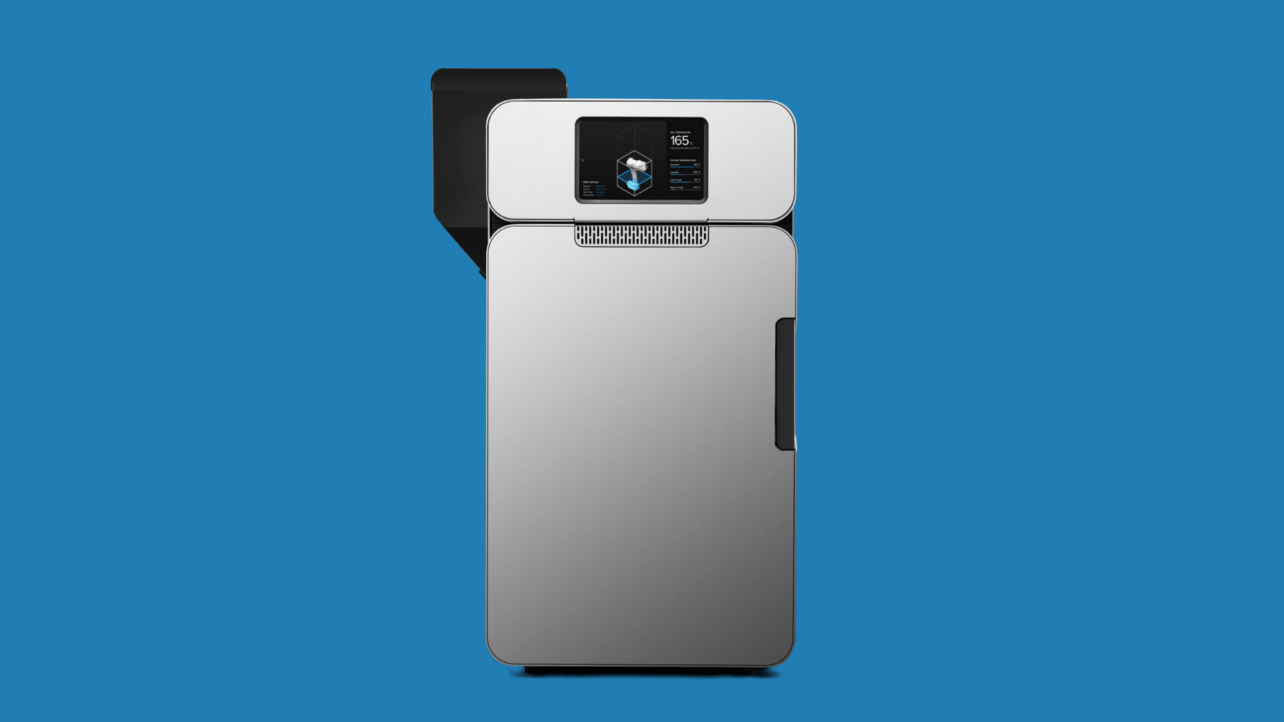
SLS provides designers with freedom to customize the design and use it for various purposes.
Understanding the limitations of the technology and using it appropriately, one can design best alternatives as compared to the ones printed with other technologies.
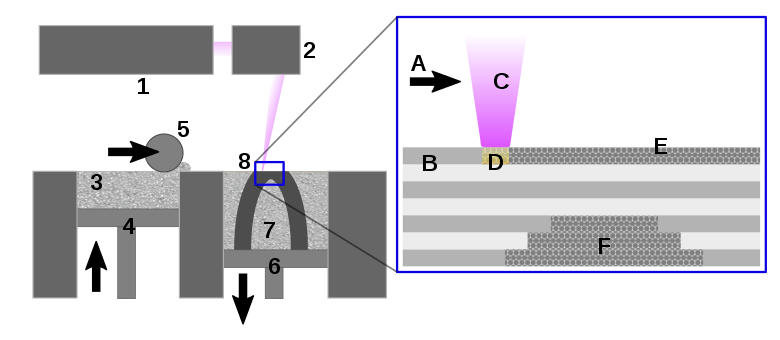
The technology based on powder bed fusion. In this technology, a laser is exposed to the powder bed which sinters the particles together to form layers.
Each layer is printed at a time and the next layer is built over the previous one making additive manufacturing.
Working of Selective Laser Sintering
The working of SLS is very different from the other technologies discussed above. And, requires CO2 laser to solidify the powder particles in following ways.
- At first, the temperature of powder bin and that of the build area is brought just under the melting temperature of the material (polymer used). Recoating blade spreads the powder layer by layer on the build area.
- Every time the polymer is spread, a CO2 laser is passed through the bed to sinter the particles together solidifying each layer at a time.
- After very layer is completed, the bed moves downward for the printing of next later.
- Post processing is required with SLS 3D printing. The parts are submerged inside the loose powder and are later cleaned with the help of compressed air or other methods.
 Credits: wikipedia.org
Parts Characteristics
SLS is among one of the most accurate 3D printing technologies present so far.
When printing in small batches, one can take full advantage of the technology by utilizing the entire volume of surface area available for print.
This is because, the time taken to print the parts of the given height is same for one or multiple parts printed at a time.
Let us check the characteristics of the parts printed for understanding its feasible application:
- Bond Strength: Bond strength of SLS is remarkable which means that the layer adhesion is excellent with SLS 3D printing. Because of which parts printed with SLS 3D printing demonstrates isotropic properties. The parts also are highly tensile, however, brittle. This is because the parts are porous internally after completion. This porosity is also a reason for making these parts favourable for hot bath. So, you can dye it with any colour you like.
- Chances of Over-sintering: This can happen when the heat fuses the powder bed around a feature. This may lead to improper details in the final part for example holes and slots. However, this can be reduced or completely eliminated by choosing the correct size of the feature and the favourable wall thickness. As, over-sintering depends on these two reasons.
- Parts Shrinkage: As SLA, SLS parts are also prone to shrinkage. After cooling, as per the rule of thermodynamics, the dimension decreases. It also ends up increasing the internal stress that pulls the parts upward. One can though design taking into account the limitation to reduce its effect mostly.
- Good for Hollow Parts: SLS can be used for printing hollow parts effectively as it does not require support structures. This also helps in reducing weight and printing cost of the parts. Leaving escape holes will help in removal of unsintered powder and thus helping in easy cleaning. To achieve high stiffness, you can escape the holes and keeping the parts completely solid.
Benefits of SLS
SLS 3D printing has many benefits and some of the major ones are listed below:
- As SLS 3D printing creates isotropic parts, it is convenient to build functional prototypes easily with great accuracy with SLS 3D printing.
- It takes the same time to build one part or multiple part with the same height. Hence, it is great for small batch printing.
- It requires no support structure which reduces the need for material in use. And, SLS 3D printing is also great option for printing complex geometrical designs.
5. Selective Laser Melting (SLM)
As the name suggests, Selective laser melting or SLM is an additive manufacturing technology that works by melting the powder metal to link together in layer by layer.
This is also categorized under the powder bed fusion family and works in the similar fashion as SLS.
However, the biggest difference is the material used in case of SLM. SLM is specifically used for metals. If you are looking to print parts from metal, you must go with SLM.
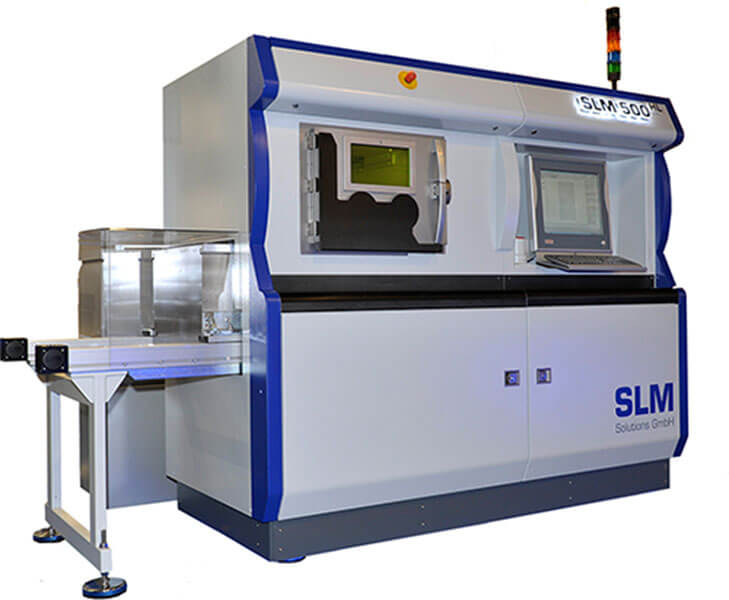 3D Printer: SLM 500 HL
The technology works in the same fashion and has the same basic working stages as that of SLS.
One of the major differences is the requirement of support structure for few parts especially with overhands which is not required in SLS.
In SLS, where the material weight isn’t huge, the surrounding powder is enough to provide support to the parts, which isn’t possible in the case of SLM 3D printing.
Working of Selective Laser Melting
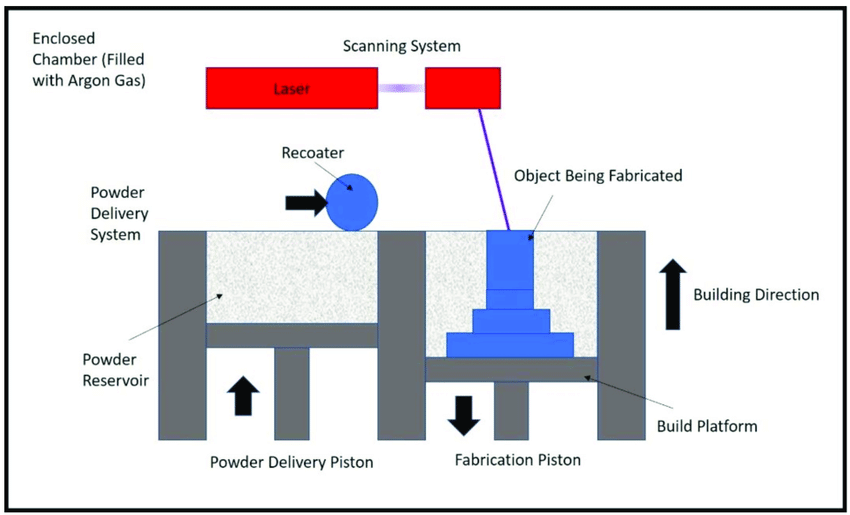
In SLM, a chamber is present to accommodate the metal powder. This metal powder is spread on the build surface using thin coatings by a blade known as coater blade.
Later, a laser is passed through the powder bed which selectively melts the metal which joins together forming the layer.
Once the layer is printed, the surface moves down and the next layer is printed in the similar fashion.
A controlled atmosphere is maintained to accomplish the SLM 3D printing process.
After the part is completely printed, it is removed from the surface with the help of a bandsaw. Later the support structures are removed.
 Credits: wikipedia.org
This can be difficult at times as these support structures are made of same material having the same strength making it a time consuming process as well.
Also, as the parts are removed from the surface plate, the finishing can be an issue. In case you are looking for a smooth surface, further post processing would be a plus.
- Diverse Material Availability: For SLM 3D printing, there are large number of metals available that can be used to print parts with varying mechanical properties and strength. One can choose the metal according to the need.
- Complex Designs: SLM 3D printing gives way to complex geometric designs. It is easy to process complex designs with ease which is very difficult to manufacture with traditional methods.
- Inexpensive: Think of traditional methods and the manufacturing overheads required. All these put a lot of burden, either it’s the labour cost or the set up cost, traditional manufacturing is expensive and tiring process. However, SLM 3D printing is inexpensive when compared to the traditional methods.
- No Tooling Needed: One can easily save a lot of lead time as there is no requirement of tooling when it comes to SLM 3D printing which is a huge highlight in case of traditional manufacturing.
- Multiple Parts Possible: SLM can be used for printing multiple parts at a time. This saves time and helps in further reducing the cost and turnaround time.
Along with the huge benefits that SLM 3D printing provides, there are certain limitations that still hold this technology to getting into everyone’s hand.
- Specialized Training Required: It is not easy to work with SLM as it is with FDM. So, one designing the blueprint or involved in any of the printing stages with SLM, must acquire deep and thorough knowledge and training.
- Used for Small Parts: The usage of the technology is limited to the small parts as of now. Thus, the application is also restricted to the parts with smaller dimensions.
- Post Processing Required: Parts printed with SLM 3D printing requires a lot of post processing. From smoothening of the surface to the elimination of support structure, every stage is tiring.
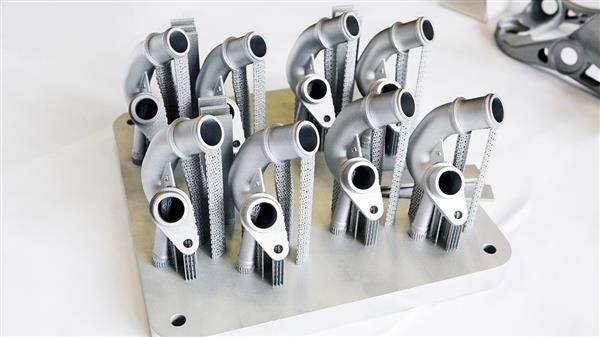
Although the application of SLM is restricted due to the limitations it has, there are quite a number of industries where SLM 3D printing is very helpful.
SLM is utilized for doing implants and printing medical components.
It is used to print ducts and various other parts for Aerospace industry. Automotive industry is also benefited with the prototypes SLM 3D printing is capable of printing.
There are other usages of SLM 3D printing and is continually being experimented to understand its value and where it can further be used to make a difference.
6. Electronic Beam Melting (EBM)
This 3D printing technology which is known as Electronic Beam Melting and abbreviated as EBM is again from the family of powder bed fusion. The technology is used for printing metal parts.
Like SLM, the basic printing process remains same, only difference being the electrons used to melt the metal instead of laser.
Working of Electronic Beam Melting (EBM)
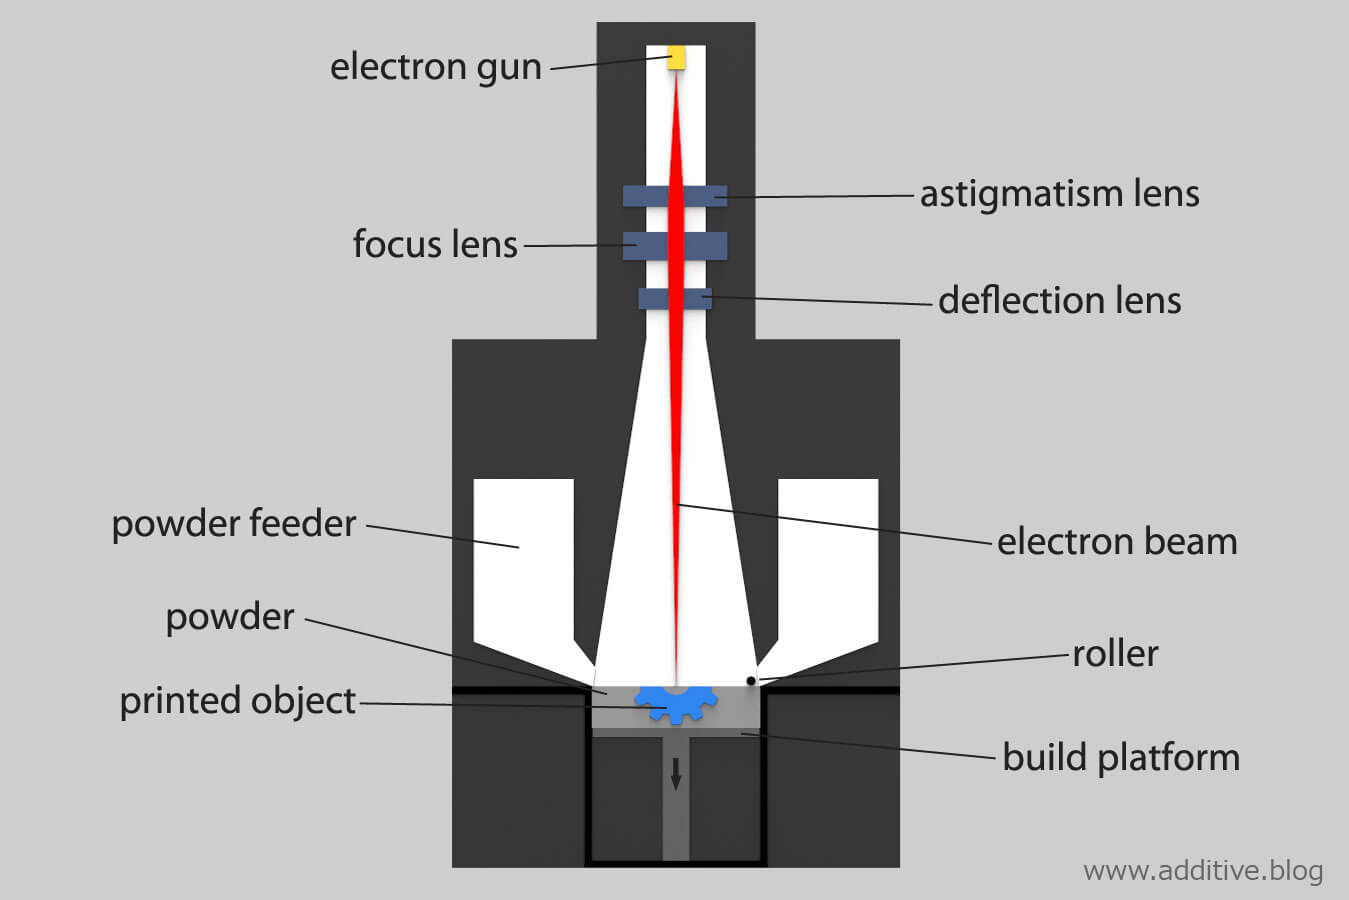
As mentioned earlier, EBM works in the same fashion as SLM. The metal powder is used inside the container which is further spread over the build surface as a thin coating with the help of the coater.
These are preheated and melted with the help of electron beams to sinter the powder particles together.
This causes the power bed to solidify and the build surface is moved downward for printing the next layer. This happens until the complete part is printed and finished.
Similar to SLM, EBM also needs huge post processing to get the final part.
The part must be detached from the platform and cleaned, either using the unsintered powder or brush. As EBM requires support structure for manufacturing of some parts, these must be removed as well after the printing is complete.
Because the support parts are built with the same metal, it sometimes become a time consuming process.
More About Electron Beams
The one dissimilarity that makes a huge difference between the working of EBM and SLM is the use of energy source. In SLM, laser is used to diffuse the metal together whereas in EBM, electron beam is used.
These electrons are electrically charged particles which are produced by heating a tungsten filament in vacuum.
These particles are then provided the direction through electromagnets which falls on the build surface bed and melt the powder particles for solidifying the layer.
The reason why the filament is heated in a vacuum is that to avoid the oxidation of the metals which may ruin the metal if came in contact with oxygen.
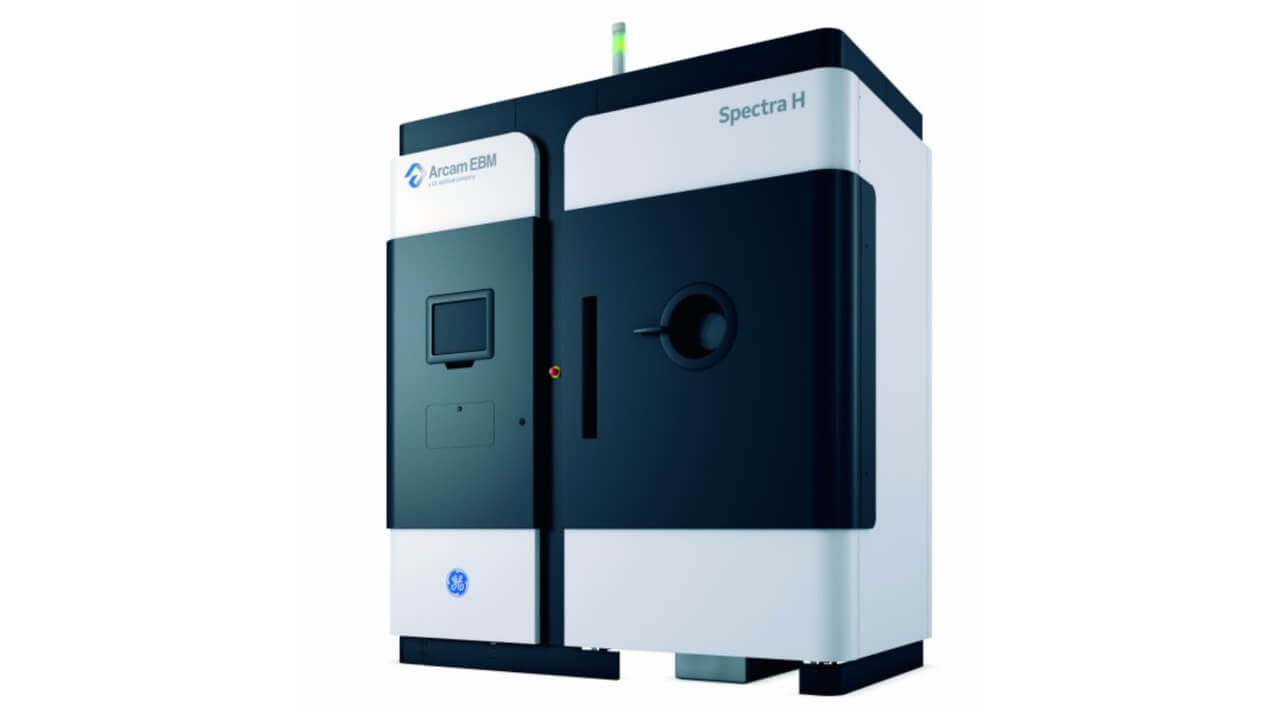
The Arcam Spectra H is one of the only EBM 3D printers. Credit: Arcam EBM
Material Used for EBM 3D Printing
Because the electrons melting happens with the help of electric charges, metals with conducive properties must be used, or the melting won’t happen at all. So, there is no way one can print parts made of ceramics or plastic with EBM 3D printing.
What to Use: EBM or SLM?
Apart from the energy source, everything remains same for EBM 3D printing and SLM 3D printing.
So, the question about which one to choose is always a matter for discussion. Understanding the benefits and limitations of each technology, one can make the informed choice.
Benefits: As the electron beams can heat the powder at different places simultaneously, it provides high manufacturing speed as compared to the SLM 3D printing.
Moreover, the need for support structures are significantly less with EBM as preheating process in EBM keeps the check on deformities. Thus, significantly reducing the strengthening or support needs.
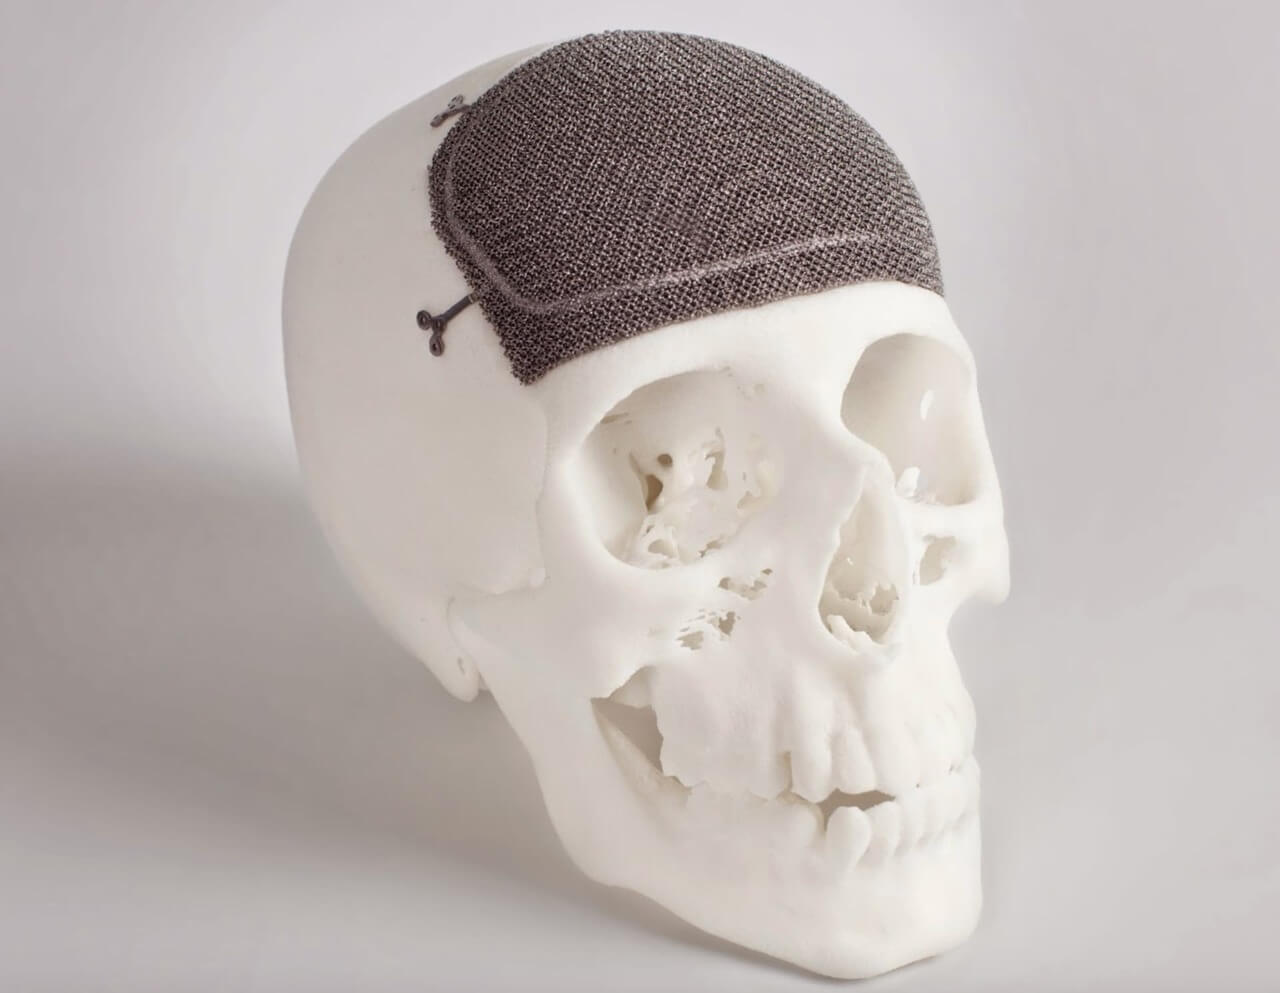 3D Printed Skull Implant. Credit: Custom Cranio-Maxillofacial implant
Limitations:
Because the electron range when it reaches the powder is much wider than the laser beam, the accuracy is always a constraint. Hence, the accuracy achieved with SLM is excellent and is not possible to accomplish with EBM.
Both SLM and EBM machines are unable to print large parts and are very expensive which restricts the usage of both the technology for industries and big manufacturers.
Also, post processing is a challenge for both the technologies. Parts produced with EBM has a sand casting finish and must be smoothened for desired results.
The application of both EBM and SLM is limited to certain niches. However, introducing newer and finer methods to hone the working of these technologies are always in talks.
7. Laminated Object Manufacturing (LOM)
 Credit: 3D Print Expo
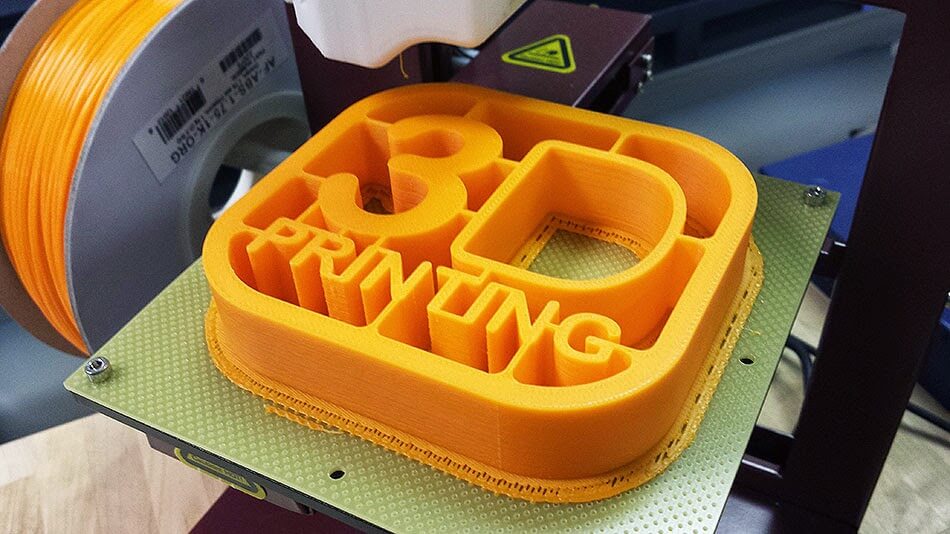
Laminated Object Manufacturing is also from the family of additive manufacturing, however, lesser known as compared to the other choices.
Unlike other processes, in LOM, the build material is layered over one another while bonding each layer with heat and pressure and finally cutting them into desired dimensions and shape with carbon laser or blade.
LOM may not be as popular as other additive manufacturing processes, however, it is one of the fastest as well as affordable options known.
Working of Laminated Object Manufacturing (LOM)
 Credit: Pinterest
As it is with other 3D printing processes, the working start with the requirement of the CAD file. This file is further converted into STL or 3DS through scaling so that printer can understand the directions for printing.
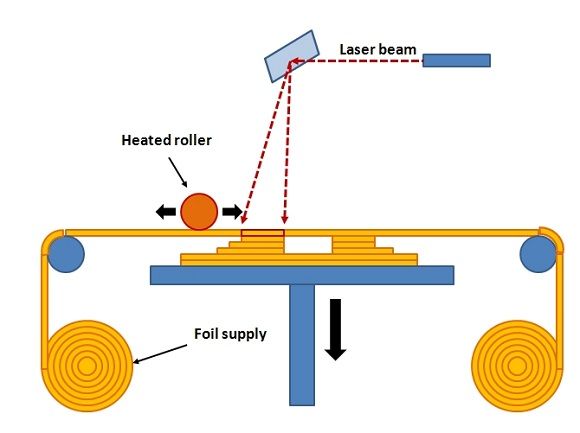
LOM 3D printing can be used for paper, plastic and metal parts. The printer uses a feed roller to draw the sheets of material to the build surface bed. If the material used is either paper or plastic, these are coated with adhesive.
A heated roller is then passed across the build surface and over the sheet of material to melt the adhesive and fuse the sheets together. The laser is then used to cut the shapes of the layer to the desired design.
After the layer is completed, the surface moves down and the next sheet is drawn over the previous one. The same process goes after every layer is completed until the part is finished printing.
Once the part is completed, it is taken off from the build platform and taken over for finishing. This may include removing of any excess material manually.
Properties of Parts Build with LOM
Though LOM is not capable of printing parts as accurate as SLA or SLS, it is still useful for many purposes. It has certain advantages and limitations that make it compatible for few applications while restricting its usage for others.
Large Parts Possible: As the LOM 3D printing does not uses any chemical reactions to carry on the printing process, the parts can be printed without the need for any enclosed chambers. This means that one can print large parts with Lamination Object Manufacturing.
Inexpensive: LOM uses material that are inexpensive and are easily available. The common material used for printing with LOM makes it easy to work around with the printer.
Easy to Operate: Working with LOM is easy comparative to working with SLS or SLA or many other additive manufacturing processes. The little know how required to use the printer makes it easy for everyone to learn and work with this 3D printing technology.
Insufficient for Complex Designs: One cannot create designs with complex geometric requirements. Hence, the parts manufactured with LOM lacks accuracy of fine coverage.
Incapable of Printing Hollow Parts: Parts designed with LOM cannot be hollow from within. The technology can only print parts that are fully solid.
Visual Prototypes Only: One cannot create functional prototypes using LOM. It can only be utilized for printing models for testing their designs and forms. However, LOM 3D printing can be made possible for print patters for traditional manufacturing.
8. Binder Jetting (BJ)
Binder Jetting abbreviated as BJ has been around for few years now, relatively newer than the other 3D printing technologies.
This technology is based on the powder bed technology, however uses liquid binder agent instead of an energy source to bind the particles of powder together to form the layers.
Most often, this is known to be the combination of SLS (discussed earlier) and material jetting (discussed later in the guide).
The 3D printer has a print head that jet out the liquid binder and that is the reason why it is called as similar to material jetting.
Working of Binder Jetting (BJ)
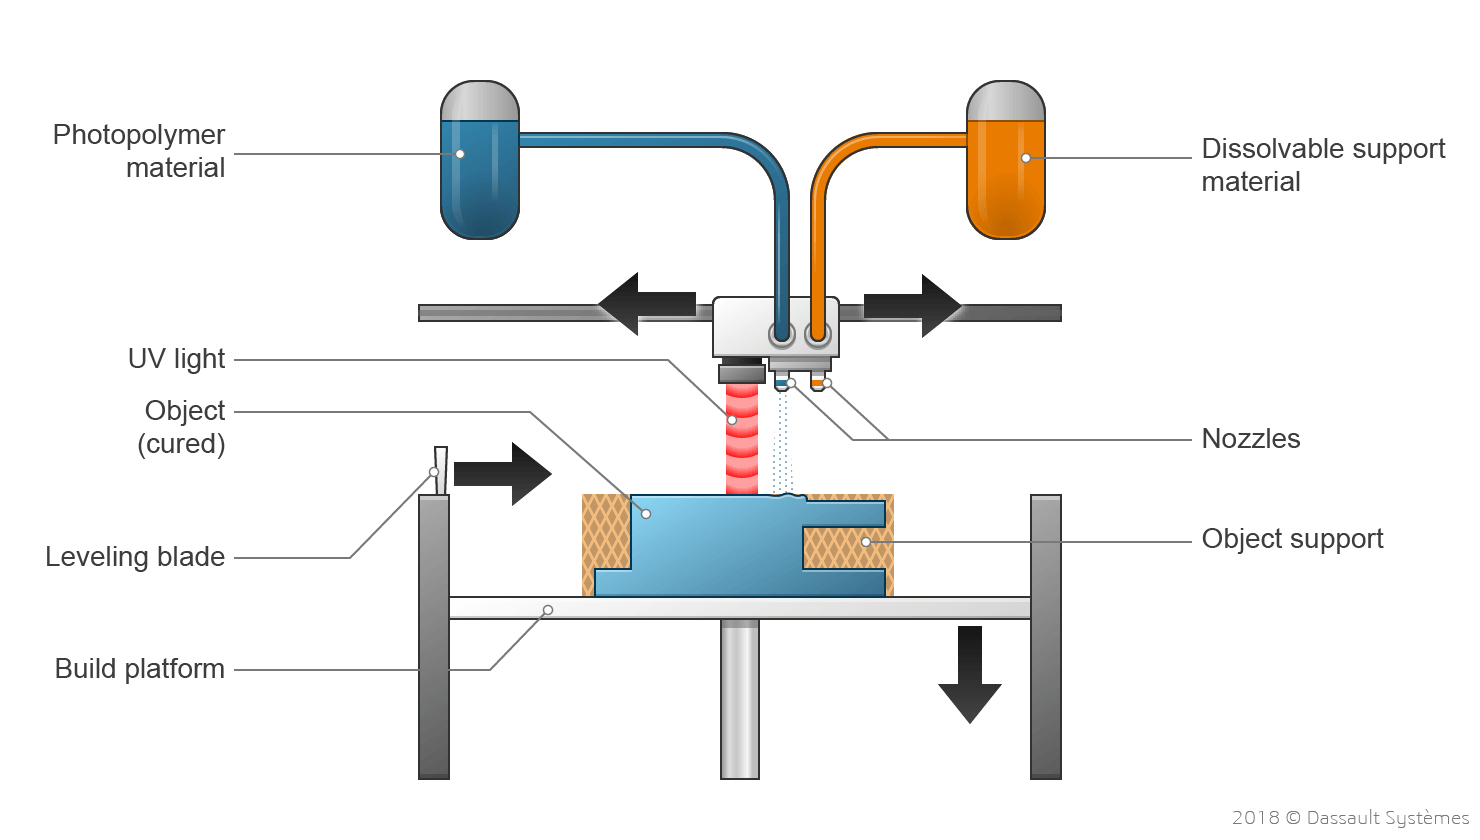
Binder Jetting 3D printer is mainly made of multiple or single powder bin (depending on the maker), powder recoater, build platform, material container and print heads.
After the SLT file is prepared, the BJ 3D printer comes into action. Similar to SLS, the first step is to fill the powder bin. However, the difference is that there is no use of heat during the entire process whereas, in SLS powder is pre-heated.
The powder recoater is used to spread the powder layer by layer. After each layer is deposited on the platform, the liquid binder is jetted selectively over the powder binding the particles together forming one layer.
Once the layer is completed, the powder is again spread over the completed layer and the same process of binding happens.
The liquid binder act as a glue to fuse the powder particles together. Once the layer is formed, the platform shifts downward making room for the next layer.
The parts are left covered with powder for some time to help provide support to the part.
During the curing, these loose powder particles that cover the part act as the structural support for the part.
Later, the parts are dug out. This is done using compressed air to clear the loose powder. The post processing happens thereafter.
Binder Jetting for Metals
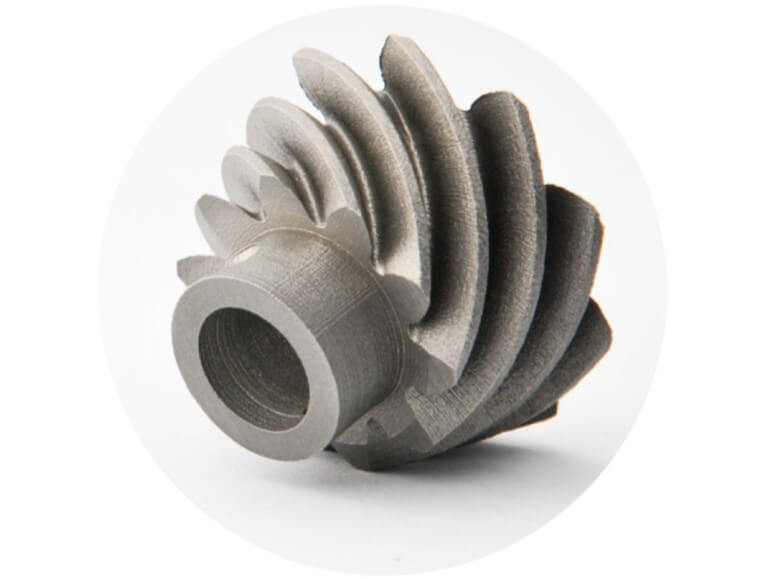
Binder Jetting can be further divided into different forms based on the material used for the printing. The one used for metals is known as metal binder jetting.
There are many metals that are used to print parts with binder jetting.
Some of the most used and commonly demanded are: sintered stainless steel, bronze infiltrated, sintered Inconel alloy.
The same process continues for printing metal parts as discussed above. And, the process can be utilized to prepare high end prototypes which are less expensive that SLS.
However, because of weaker mechanical properties, parts printed with binder jetting must go through certain post processing methods.
- Infiltration: Once the part is taken out from the submerged powder left for curing, it is put inside the furnace and is heated in order to remove the binder agent. There are many holes left during the printing process. To fill these holes and increases the mechanical properties of the part, the holes are filled with the metals with low melting point. This improves the strength and density of the parts.
- Sintering: Another way to increase the strength and density, sintering is one of the usually followed post processing methods after the curing in complete in binder jetting. For sintering, the parts are put in the furnace and heated to relatively high temperature as compared to the infiltration process. This starts sintering and enhances strength of the part.
Note: Later, other post processing methods can be applied only after any of the above methods have been completed.
Binder Jetting for Sand
One can achieve high quality and complex sand molds with sand binder jetting. This type of binder jetting is done with sandstone or one can also use artificial sand. To print full colour molds, PMMA is used as the printing material.
For printing colourful molds, BJ printer must have multiple print heads. To do so, the binder liquid is first jetted which is followed by colour droplets.
Moreover, unlike metal binder jetting, there is no post processing required for this process which makes it much more cost effective and less of the tiring process.
Pros & Cons of Binder Jetting
- Can be used for large parts.
- The material is not as expensive as used for other processes.
- Designs with complexity can be built with ease.
- The powder left unused can be 100% recycled and used for another part
- Required post processing for metal binder jetting because of lower mechanical strength and density
- In comparison to other 3D printing processes, the material variety is small.
9. Material Jetting (MJ)
Many consider material jetting also known as MJ very similar to 2D printing. Like binder jetting, the print heads are a part of the Material Jetting printers.
These are used to dispense printing droplets that solidifies when exposed with UV light. These droplets are made of photosynthesis material and are available in the liquid form.
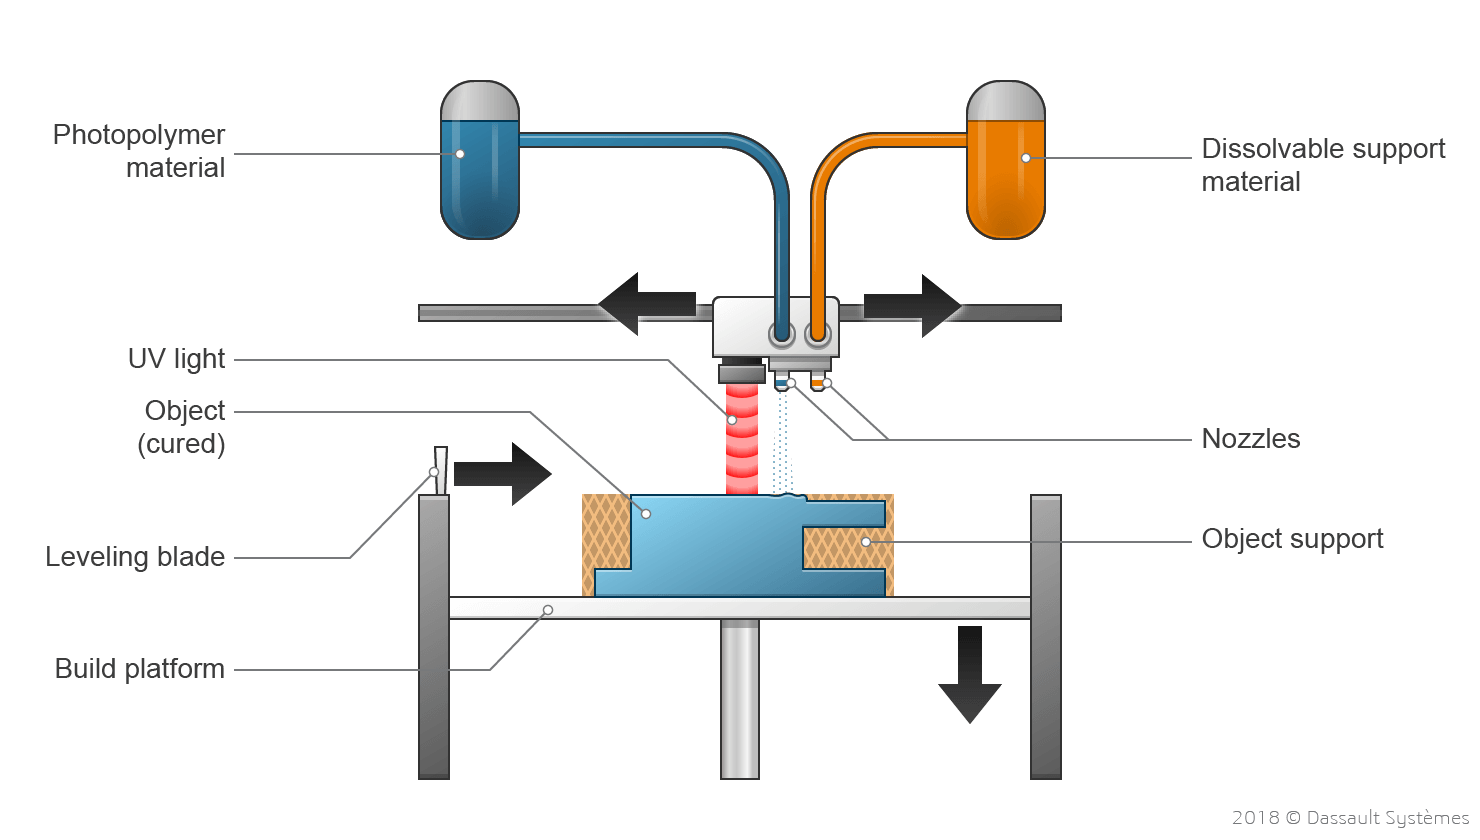
Working of Material Jetting
Material Jetting works by treating the liquid resin and then starting the printing process.
- To start with, the liquid resin is heated in order to attain desired viscosity favorable for printing. It is heated in between 30-60 degree Celsius.
- These droplets are deposited over the powder layer through print heads. To cure the deposited material, UV light source is exposed to the build surface solidifying the layer.
- This completes the layer and the platform moves downward paving way for the next layer. The powder layer is deposited and the same process follows again.
- This happens until the part is completely printed.
Parts Properties after Material Jetting
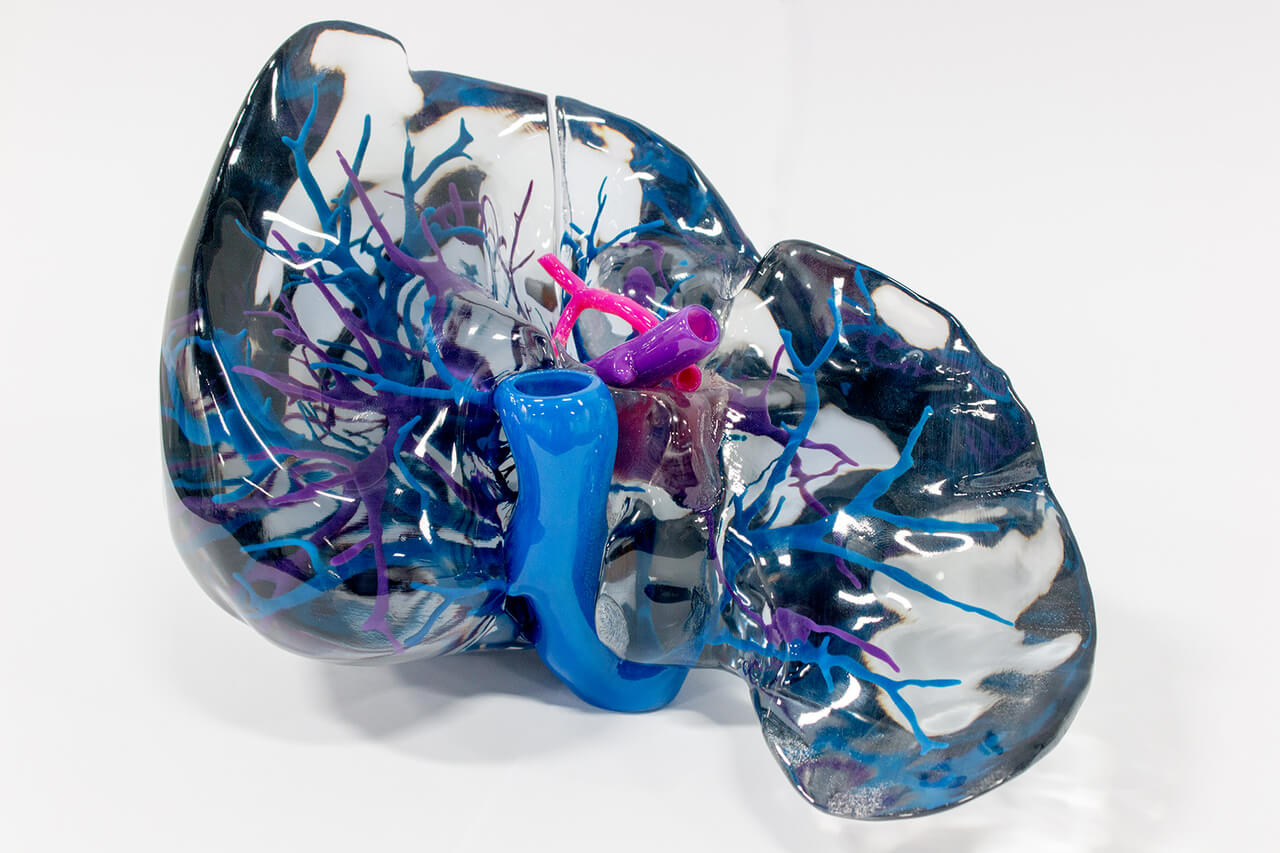 Credits: sys-uk.com
Material Jetting produces most accurate parts even those with great geometric complexity in demand.
- Color Printing: With multiple print heads, one can achieve multiple color parts. It also allows for different material to be used for the same part. Even the sections of each part can be printed with different layers.
- Support Structure Requirement: One reason why material jetting isn’t very easy to process is because of the requirement of support structure for every part. The printing cannot happen without support structure.
- Different Surface Finish Available: With Material Jetting, one can print parts with matte as well as smooth finish. The matte setting comes for a higher cost as compared to the glossy setting.
Pros & Cons of Material Jetting
- Parts printed with Material Jetting does not required to be smoothened later as it can print parts that are very smooth and glossy.
- It produces parts with homogeneous thermal and mechanical properties.
- The 3D printing technology is great for visual as well as functional prototypes and various other applications
Source PICK3DPRINTER
- Although few functional prototypes are made with Material Jetting, the lower mechanical properties restrict its application width
- Also, because the parts are made of photosensitive material, their mechanical properties are prone to degradation after certain period of time. Especially when exposed to sun and used outside.
- Moreover, the cost related to Material Jetting 3D printing is higher and is mostly suitable for industrial purposes. Hence, it makes it less popular for smaller set ups and those with limited funds.

