MK10 All Metal Hotend Kit installation instructions
Nov 21st 2015

Tools needed:
- Adjustable wrench (1 inch)
- Cutters
- Needle nose pliers
- 9mm wrench
- 5mm hex wrench
- 2mm hex wrench
- Sharpie/marker
- Round file
- Thermal Compound (included in kit)

- Preheat left and right nozzle

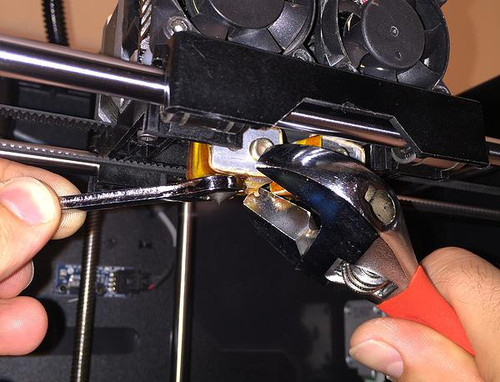
- Hold the heater block withrPadjustable wrench and remove the nozzle using 9mm wrench. Be careful where you are clamping with adjustable wrench, don't damage the heating element or thermocouple.

- Remove PTFE tube using needle nose pliers. Repeat step 2 and 3 for both extruders.

- Unplug motor cables, both left and right.

- Remove the screws holding filament tube bracket. Remove filament tube bracket.

- Unscrew the screws holding extruder cooling fan.

- Remove exruder motor assembly.

- Repeat step 6 and 7 for the other extruder.

- Take apart and set aside all the hardware holding fan to heatsink.

- Repeat step 9 for the other extruder

- Remove the cooling bar assembly from the carriage. There are 2 screws at the buttom of the carriage holding the cooling bar. Remove them using 2.5mm hex wrench.

- Set the whole cooling bar assembly on cardboard or other platform and set it on top of the printer like shown in the picture.

- loosen set screw locating on the back of the cooling bar. The set screw clamps and holds in place thermal barrier tube.

- Repeat step 13 for the other extruder. Before removing thermal tube, somehow mark which heating block goes where. In our case we marked it with a marker on coolingrPbar and tape on the heater block. If you use marker for the heater block, don't forget to wipe it off before heating it.

- Remove both thermal tubes from the cooling bar. This part can be easy or difficult depending on how hard those set screws holding the thermal tube where tight at the factory. In our case they were stock really hard there. We had to really pound on them to get them out.

- After taking both thermal tubes out, Clean both bores with some sandpaper. If you have round file, file a groove on the set screw side. This groove will let you easily slide the new thermal barrier tube in a future. Make sure you don't file on a wrong side, the other side is important for heat transfer.

- Unscrew and remove thermal tube from left and right heater block.

- Screw in the new includedrPnozzle all the way until it buttoms out.

- Then back off about 1/2 of the turn. You want about 1/2 turn left until it buttoms out.
- Do the same for the other nozzle.

- Screw in new thermal barrier tube until it mates with a nozzle. Don't use any wrenches just tighten using finger pressure.

- Do the same for both extruders.

- Test fit both thermal barrier tubes if they go into cooling bar smoothly. If any of them stick, polish the bore with a sandpaper.

- Put some thermal compound on the aluminum portion of thermal barrier tube. Then evenly spread it all around the tube. Do the same for both extruders.

- Install both thermal barrier tubes into the cooling bar. Don't tighten the set screws yet.

- Adjust thermal tube height so it sticks out about .050" from the top of the cooling bar. It doesn't have to be exactly right on. Then lightly snug both set screw. Don't tighten it too much. You still need to be able to slide itrPto calibrate nozzle height.

- Install cooling bar assembly back on the carriage.

- Tighten and secure cooling bar to the carriage.

- Bring the table by hands up to nozzle that sits lower. Then adjust the other nozzle so it sits flush on the table as well.

- Completely tighten both set screws.

- Assemble cooling fan to heatsink as shown.

- Install both extruder motors back on the carriage.

- Reconnect both extruder motors.

- Install filament tube bracket.

- Preheat both nozzles.

- Tighten and seal both nozzles using 9mm wrench.
- Relevel the build plate. Be careful, nozzle height was changed. Start out low and then bring the table up.
Enjoy your new All Metal Hotend!!


